I gave a talk at ElixirConf 2015 on combining the Phoenix web framework with the Elm programming language. This is the tutorial that was referred to in that talk.
The tutorial walks through the creation of a very basic seat saving application, like one you'd use when booking a flight for example. The application will do just enough to demonstrate the mechanisms for getting the two technologies talking to each other.
There is an accompanying repo for this tutorial. Each of the numbered steps has an associated commit so that you can just look at the diffs if you'd rather not read through the whole thing.
Introducing Phoenix channels
We took a look, in Part 9, at how to fetch our initial seat data via an HTTP request. However, one of the most compelling reasons to use Phoenix is because of it's first class support for Channels. Channels are a way to communicate with our Phoenix application in realtime across an open connection. They fit our Elm architecture well as they are all about the flow of data.
But first ...
Before we start, let's rewind our efforts from Part 9. We don't need most of the code that we added and it could serve to confuse things. We can re-add what we do need when we need it.
If you created a branch in your own version of the project then you can just dump it, or do whatever you need to do to get back to the pre-HTTP state.
If you can't do that, then checking out the pre-http branch of the SeatSaver repo should get you to where you need to be.
Creating a channel
We'll start by creating a channel and then look at how to join that channel. We'll wrap things up for this part by fetching our initial seat data over that channel.
Phoenix has a built-in mix generator for creating channels, so let's use that.
mix phoenix.gen.channel Seat seatsThis gives us a number of files, some of which we will need to now tweak to suit our use case. Start by updating web/channels/user_socket.ex to create a channel with a topic:subtopic of
seats:plannerthat points to our newly generated SeatChannel module.defmodule SeatSaver.UserSocket do use Phoenix.Socket ## Channels # channel "rooms:*", SeatSaver.RoomChannel channel "seats:planner", SeatSaver.SeatChannel ... endNow open that SeatChannel module in file web/channels/seat_channel.ex and update the
joinfunction to have the same topic:subtopic pair.defmodule SeatSaver.SeatChannel do use SeatSaver.Web, :channel def join("seats:planner", payload, socket) do ... end ... endFinally update the associated test in test/channels/seatchanneltest.exs to also have that topic:subtopic pair.
defmodule SeatSaver.SeatChannelTest do
  ...

  setup do
    {:ok, _, socket} =
      socket("user_id", %{some: :assign})
      |> subscribe_and_join(SeatChannel, "seats:planner")

   ...
  end

  ...

  test "shout broadcasts to seats:planner", %{socket: socket} do
    ...
  end

  ...
end
You can check to see if everything has worked as expected by running
mix test(you should have 7 passing tests).
Joining the channel
Now that we have a channel, we need to set things up on the client side to connect to the channel.
Open the web/static/js/socket.js file and change the topic:subtopic to
seats:planneron line 57.... socket.connect() // Now that you are connected, you can join channels with a topic: let channel = socket.channel("seats:planner", {}) ...Now open web/static/js/app.js and uncomment line 21.
import socket from "./socket"If you visit http://localhost:4000 and check the web console, you should see
Joined successfully.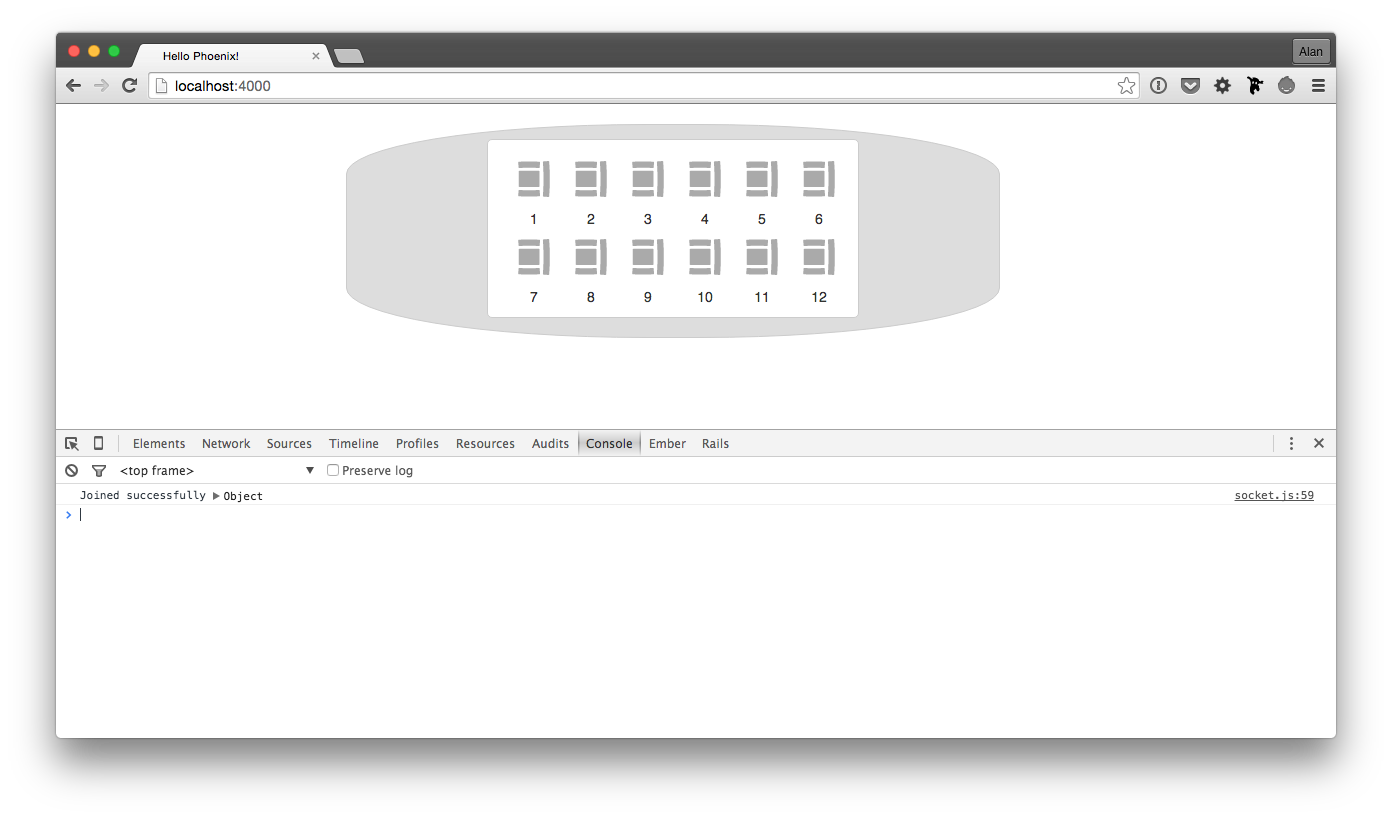
Getting initial seat data
Let's now fetch the initial seat data from the database and make it available to the client. Before we can get the initial data we need to store it in the database.
Let's start by creating a Seat model.
mix phoenix.gen.model Seat seats seat_no:integer occupied:booleanThen migrate the database.
mix ecto.migrate*Please note*: if you see the following error, it is because you will have created the seats table already during [Part 9](/posts/phoenix-elm-9). You can either skip this step or, if you want a clean slate, drop the table in psql (or your Postgres tool of choice).
(Postgrex.Error) ERROR (duplicate_table): relation "seats" already exists
Thanks to Libby (@emhoracek) for raising this as an issue. :)Let's run the generated tests with
mix testto ensure that we haven't broken anything so far. We should have 9 passing tests.We can use the priv/repo/seeds.exs file to populate some seat data for us, same as we did in Part 9. Add the following to the end of that file (note that the first two seats are occupied but the rest are not):
SeatSaver.Repo.insert!(%SeatSaver.Seat{seat_no: 1, occupied: true})
SeatSaver.Repo.insert!(%SeatSaver.Seat{seat_no: 2, occupied: true})
SeatSaver.Repo.insert!(%SeatSaver.Seat{seat_no: 3, occupied: false})
SeatSaver.Repo.insert!(%SeatSaver.Seat{seat_no: 4, occupied: false})
SeatSaver.Repo.insert!(%SeatSaver.Seat{seat_no: 5, occupied: false})
SeatSaver.Repo.insert!(%SeatSaver.Seat{seat_no: 6, occupied: false})
SeatSaver.Repo.insert!(%SeatSaver.Seat{seat_no: 7, occupied: false})
SeatSaver.Repo.insert!(%SeatSaver.Seat{seat_no: 8, occupied: false})
SeatSaver.Repo.insert!(%SeatSaver.Seat{seat_no: 9, occupied: false})
SeatSaver.Repo.insert!(%SeatSaver.Seat{seat_no: 10, occupied: false})
SeatSaver.Repo.insert!(%SeatSaver.Seat{seat_no: 11, occupied: false})
SeatSaver.Repo.insert!(%SeatSaver.Seat{seat_no: 12, occupied: false})
Run
mix run priv/repo/seeds.exsto apply the seeds.We're really only interested in the
seat_noandoccupiedfields. Furthermore, we want to use camel case for theseat_nofield when it is used in JSON data. We can do this by implementing the Poison Encoder protocol. Add the following to the bottom of your web/models/seat.ex file, after the end of the definition SeatSaver.Seat module.defimpl Poison.Encoder, for: SeatSaver.Seat do def encode(model, opts) do %{id: model.id, seatNo: model.seat_no, occupied: model.occupied} |> Poison.Encoder.encode(opts) end endNow change the
joinfunction in the web/channels/seat_channel.ex file to callsend self(), :after_joinon successful authorization, like this:def join("seats:planner", payload, socket) do if authorized?(payload) do send self(), :after_join {:ok, socket} else {:error, %{reason: "unauthorized"}} end endIf you've watched the video for the talk that accompanies this tutorial, you'll notice a difference in approach here. In the talk I supplied the seat data directly from the
joinfunction.Since then I was informed by Claudio Ortolina (@cloud8421) that this is not the preferred approach, but rather that a message is sent to
selfthat instructs the data to be sent. This helps keep the client code clean. The code that deals with joining a channel is not also responsible for fetching the initial state, and the code that deals with fetching the initial state can be reused by the client-side application if required without having to worry about the join code.Sending
self()a message inside a channel results in a call to function calledhandle_info/2.Let's add the required
handle_infofunction (also to the web/channels/seat_channel.ex file) with the following definition:def handle_info(:after_join, socket) do seats = (from s in SeatSaver.Seat, order_by: [asc: s.seat_no]) |> Repo.all push socket, "set_seats", %{seats: seats} {:noreply, socket} endAdd the following to your web/static/js/socket.js file anywhere above the
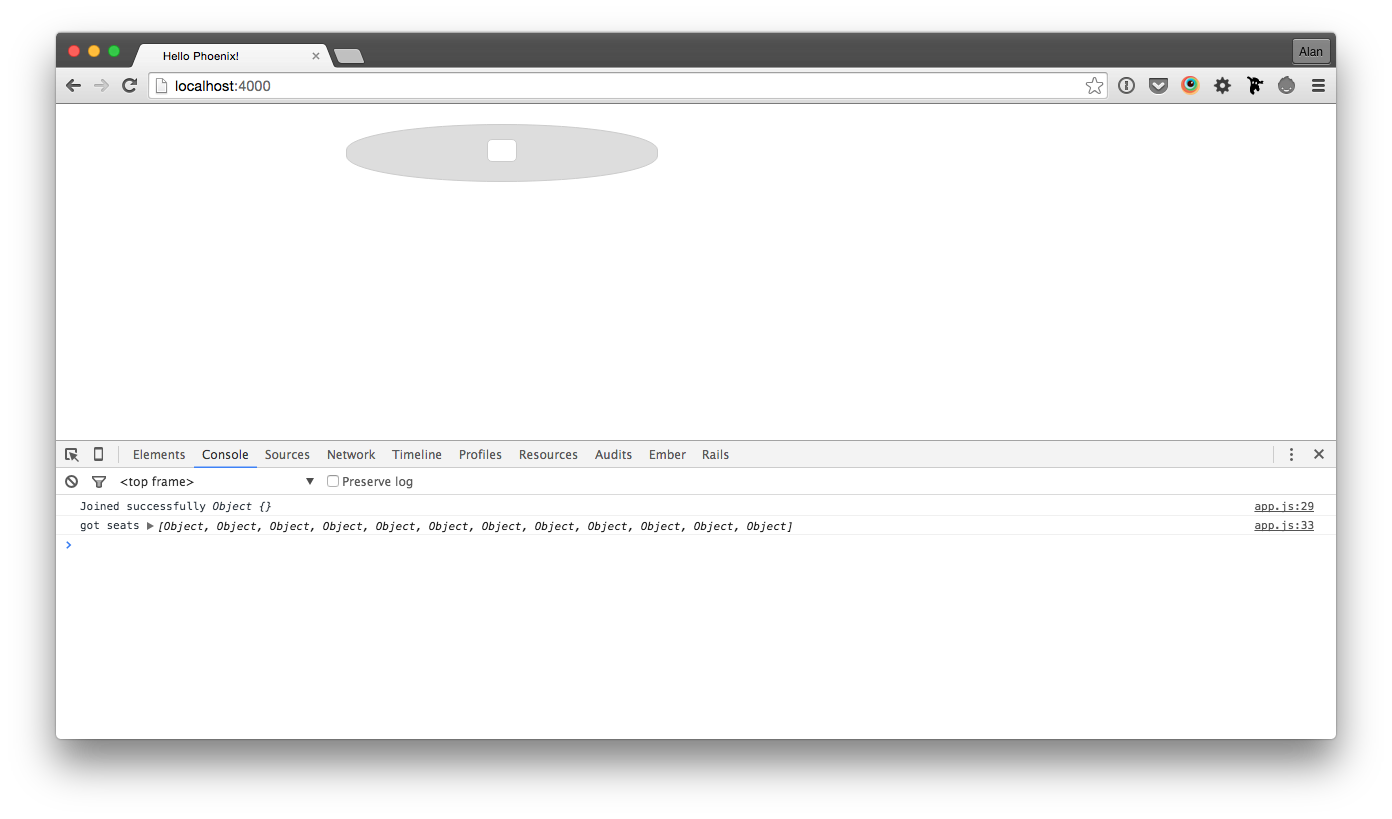
export default socketline:channel.on('set_seats', data => { console.log('got seats', data.seats) })If you go to http://localhost:4000 in your browser and open the console, you should see the following:

Getting seat data into Elm
Now that we have data being sent to the client over our channel after we've joined it, we'll want to pull that data into our Elm application so that we can use it to initialize our model.
Open the web/elm/SeatSaver.elm file and do the following:
Change the
initfunction to set the model to an empty List, like so:init : (Model, Effects Action) init = ([], Effects.none)In order to get data in and out of Elm we use a mechanism called ports. Add the following port to a signals section at the bottom of the file.
-- SIGNALS

port seatLists : Signal Model
Sending a message to an incoming port will place the data on a Signal (we looked at Signals in Part 7). In our case we want to pass in a List of Seat records, in other words our Model.
If you go to http://localhost:4000 in your browser you will see the following error:
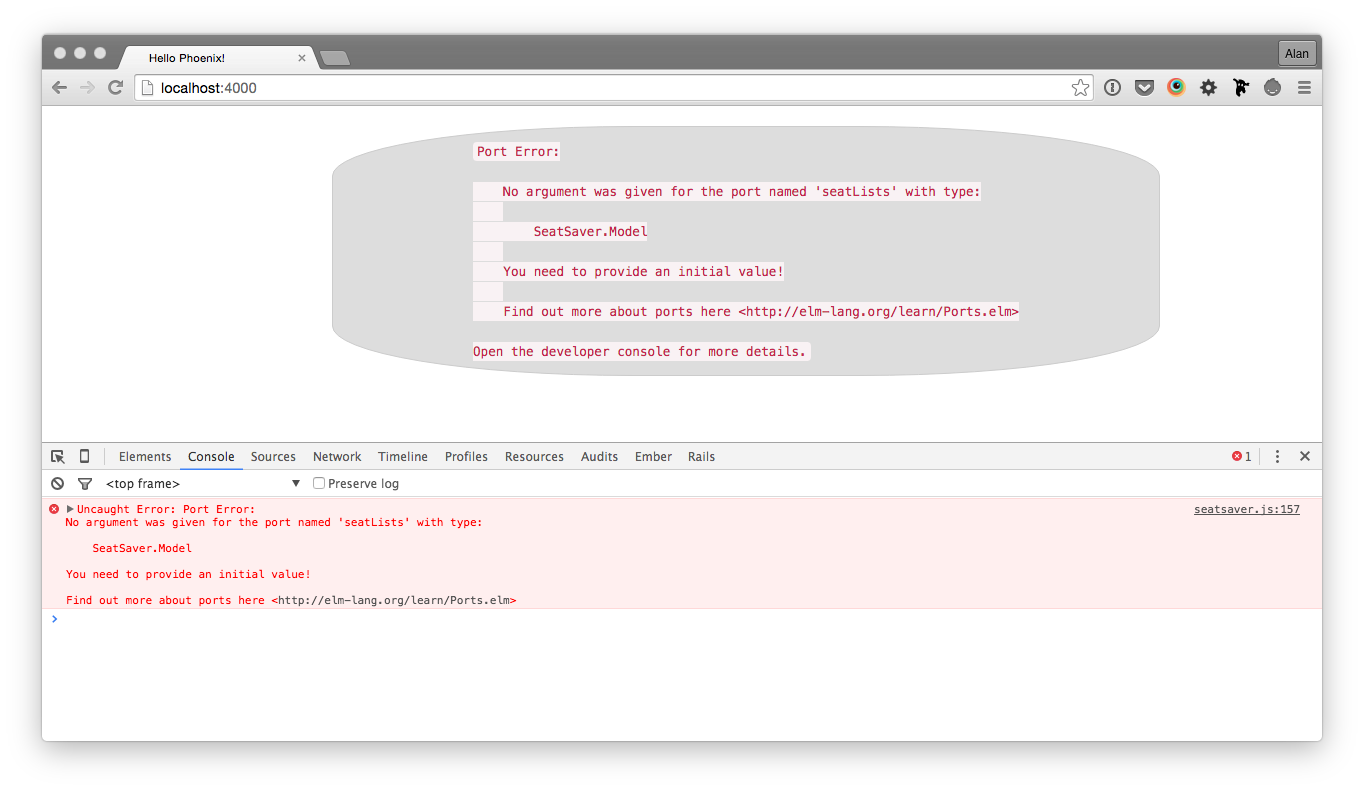
Ports need to be initialized with a starting value. This is because the port is a Signal and Signals need to have a starting value. We can do this by giving our port an initial value in web/static/js/app.js
var elmDiv = document.getElementById('elm-main')
  , initialState = {seatLists: []}
  , elmApp = Elm.embed(Elm.SeatSaver, elmDiv, initialState);
Now if you check the browser you should see
OK, so we are now initializing our model to be an empty List and we have created a port through which we can send our seat data. Now we need to send that data through the port. To make it easier to work with, let's move our channel code through from web/static/js/socket.js to web/static/js/app.js
let channel = socket.channel("seats:planner", {})
channel.join()
  .receive("ok", resp => { console.log("Joined successfully", resp) })
  .receive("error", resp => { console.log("Unable to join", resp) })

channel.on('set_seats', data => {
  console.log('got seats', data.seats)
})
We can send our seat data to this port as follows:
channel.on('set_seats', data => {
  console.log('got seats', data.seats)
  elmApp.ports.seatLists.send(data.seats)
})
Elm will automatically convert our JSON data into an Elm List for us if it can match the structure of the data passed into a type that it knows about. This is why we converted our
seat_noElixir field into the camel case versionseatNowhen outputting as JSON. Elm will recognise our JSON as a List of Seat records and convert it accordingly before placing it on the Signal.Looking at the browser again we still see no seat data. This is because we need to get the data from the port into StartApp so that it can be sent to our
updatefunction.So let's get this data along to our
updatefunction. In order to pass the data into StartApp we need to put it on a Signal with values of type Action. We can do this using theSignal.mapfunction. This converts every value on a given Signal to a different type on another Signal. In our Signals section add the following:incomingActions: Signal Action incomingActions = Signal.map SetSeats seatListsThis is shorthand for the following:
incomingActions: Signal Action
incomingActions =
  Signal.map (\seatList -> SetSeats seatList) seatLists
In other words, for every value on the
seatListsSignal, convert it into a SetSeats Action with that value as its argument, and place it on theincomingActionsSignal.Now we can add this Signal of Action as an input to our StartApp initializer in our
appfunction.app = StartApp.start { init = init , update = update , view = view , inputs = [incomingActions] }And then add the
SetSeatsaction to theupdatefunctiontype Action = Toggle Seat | SetSeats Model update : Action -> Model -> (Model, Effects Action) update action model = case action of Toggle seatToToggle -> ... SetSeats seats -> (seats, Effects.none)Because the seats that we pass in here are a List of Seats, aka a Model, we can just do a straight swap with the existing model. Thus we turn our current Model (an empty list) into a new Model (our given List of Seat records). We have no further action to take and so we have a no-op Effect.
Checking the browser you should now see all of the seat data passed through.
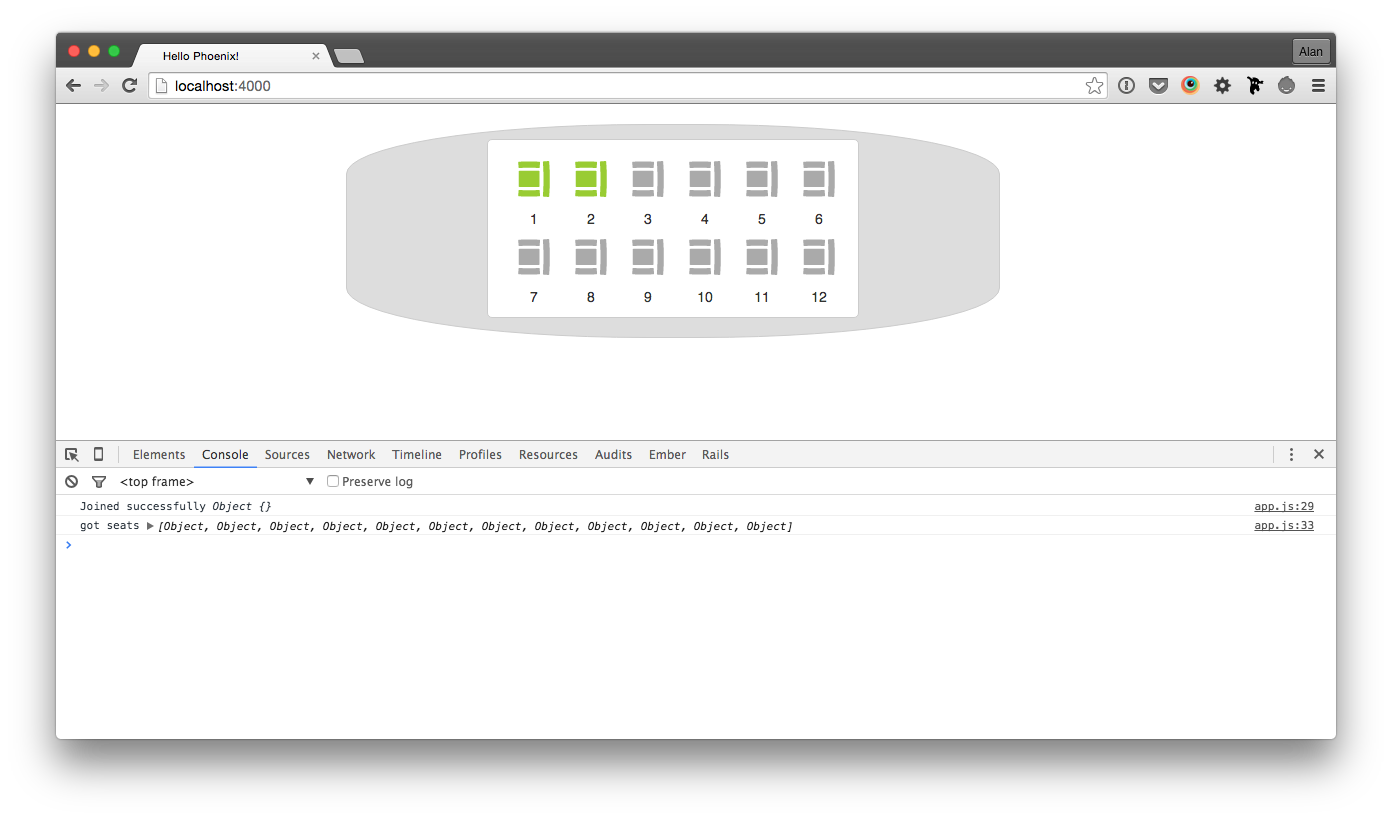
And there we have it! We are now fetching our seat data over a Phoenix channel.
Summary
We're now fetching the initial seat data using channels rather than HTTP request/response. In part 12 we'll deal with toggling a seat from available to occupied (and vice versa) over channels.