I gave a talk at ElixirConf 2015 on combining the Phoenix web framework with the Elm programming language. This is the tutorial that was referred to in that talk.
The tutorial walks through the creation of a very basic seat saving application, like one you'd use when booking a flight for example. The application will do just enough to demonstrate the mechanisms for getting the two technologies talking to each other.
There is an accompanying repo for this tutorial. Each of the numbered steps has an associated commit so that you can just look at the diffs if you'd rather not read through the whole thing.
Adding a Model and enhancing the View
The Model for our application needs to keep track of a bunch of seats. Each seat will have a seat number and a flag to tell us whether it is occupied or not.
Adding a model
Let's start with the concept of a Seat. A Seat needs to describe the state of a given seat on our airplane. In an object oriented language we'd probably reach for a class to describe a Seat. In Elm we'll use a type. In fact Elm already has a type that we can use for this, called a record. A record allows us to store named key-value pairs like so:
{ key_1 = value_1, key_2 = value_2 }
We'll use a record of a given structure for our seat. We can do this using a type alias. The type alias will enable us to say "when I talk about a Seat, I'm talking about a record with this expected structure" and we define it like so:
type alias Seat =
  { key_1 : value_1
  , key_2 : value_2
  }
At the top of our web/elm/SeatSaver.elm file under the
mainfunction, add the following:type alias Seat = { seatNo : Int , occupied : Bool }We've specified that our Seat type will be a record that contains two items: a seatNo key that will have a value of type Int, and an occupied key that will have a value of type Bool.
The Model for our application is going to be a list of seats or, I should say, a List that has elements of type Seat. We can represent that as follows:
type alias Model =
  List Seat
As before we are using a type alias to say "when I refer to Model in my application, I am talking about a List that has elements of type Seat".
We'll now create the initial model state to give us something to work with.
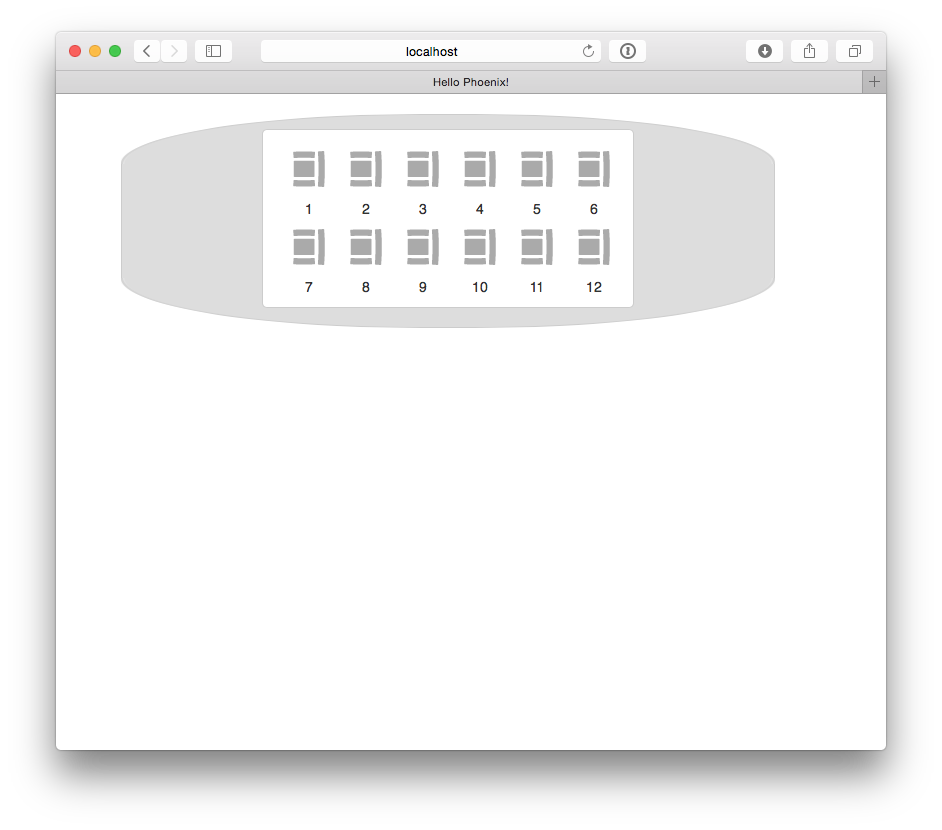
init =
  [ { seatNo = 1, occupied = False }
  , { seatNo = 2, occupied = False }
  , { seatNo = 3, occupied = False }
  , { seatNo = 4, occupied = False }
  , { seatNo = 5, occupied = False }
  , { seatNo = 6, occupied = False }
  , { seatNo = 7, occupied = False }
  , { seatNo = 8, occupied = False }
  , { seatNo = 9, occupied = False }
  , { seatNo = 10, occupied = False }
  , { seatNo = 11, occupied = False }
  , { seatNo = 12, occupied = False }
  ]
This gives us 12 seats, currently hard-wired, that we can use to get our View laid out.
Adding a comment to demark the section, we should end up with something that looks like this.
module SeatSaver exposing (..)

import Html

main =
  view

-- MODEL

type alias Seat =
  { seatNo : Int
  , occupied : Bool
  }

type alias Model =
  List Seat

init =
  [ { seatNo = 1, occupied = False }
  , { seatNo = 2, occupied = False }
  , { seatNo = 3, occupied = False }
  , { seatNo = 4, occupied = False }
  , { seatNo = 5, occupied = False }
  , { seatNo = 6, occupied = False }
  , { seatNo = 7, occupied = False }
  , { seatNo = 8, occupied = False }
  , { seatNo = 9, occupied = False }
  , { seatNo = 10, occupied = False }
  , { seatNo = 11, occupied = False }
  , { seatNo = 12, occupied = False }
  ]

-- VIEW

view =
  Html.text "Woo hoo, I'm in a View"
Using the Model in the View
We now have a Model and some initial state. Let's pass it into our View so that we can display something to our users.
In our
mainfunction we can pass the initial model to theviewfunction as a parameter.main = view initNow we can adjust our View to show the Model. We'll represent our list of seats as an unordered list with each seat being represented by a list item. We can use Elm's Html library to do this. Each element is represented by a function that takes two lists as arguments, e.g.
ul [] []. The first list holds the element's attributes, such asclass, and the second its contents, which can in turn also be other elements.-- VIEW view model = ul [ class "seats" ] (List.map seatItem model) seatItem seat = li [ class "seat available" ] [ text (toString seat.seatNo) ]Our
viewfunction returns an HTML unordered list. That unordered list is formed by usingList.mapon the List of Seat that is our model, passing each seat to theseatItemfunction.Note that we wrap(List.map seatItem model)in parentheses. In Elm parentheses are used to denote precedence, much as they are in Maths. So here we are saying, runList.map seatItem modelfirst and then pass the result of that as an argument to theulfunction. Seeing as List.map returns a List, we don't have to wrap that result in[].The
seatItemfunction returns an HTML list item, which shows the seat's seatNo as HTML text (after parsing into a string).Both the
uland thelifunctions take aclassas an attribute. This is purely for styling purposes. We'll come back to this in a bit more detail later.Before this code will work we need to change our imports.
import Html exposing (ul, li, text)
import Html.Attributes exposing (class)
Firstly we add
exposing (ul, li, text)to our original Html import. This allows us to call theul,liandtextfunctions from the Html library without prefixing them withHtml.Next we add an import for
Html.Attributesspecifically exposing theclassfunction.We can expose specific functions from a library by listing them in theexposingtuple or we can just make them all available by using the(..)syntax instead of individually listing them (i.e.import Html exposing (..)).Looking at http://localhost:4000 again we should now see our seats displayed.
Summary
Our View is now closer to what we want to be working with, thanks to introducing a Model. In Part 5 we'll introduce Type Annotations.